
Today Mickey & Minnie’s Runaway Railway opens in Hollywood Studios! While I miss the Great Movie Ride, I’m excited that Mickey & Minnie finally get their own ride! To celebrate the opening, I made this chocolate orange cookie train! Decorated with orange royal icing, it’s the perfect centerpiece to celebrate Mickey & Minnie’s new ride!

When I heard the new ride was going to have a railroad theme, I was very excited because I like trains and think they’re a fun vehicle for a ride. It also got me thinking about how I could make an edible train. My immediate thought was gingerbread, as it’s used to make houses around Christmas. However, it felt like it would be a bit out of season for March. Though, if you would like to make it out of gingerbread, check out my gingerbread cookie recipe!
And so, I settled on these chocolate orange cut out cookies. These rich chocolate cookies have just a touch of orange and are strong and sturdy enough to hold up a 3D cookie train.

The cookies themselves are straightforward to make, but assembling the train and decorating it can take a bit of time. To make the cookies, first beat the butter and then add the sugar, egg, and vanilla. Add the dry ingredients and beat on low until combined.
Divide the dough in half, shape each half into a disk, and wrap in plastic wrap. Refrigerate until the dough is firm, about 1 hour. Once the dough has chilled, remove it from the refrigerator and let it warm just a bit while you preheat the oven and line two baking sheets with parchment paper.


Next, you’ll roll out the dough to about 1/2 inch thickness. I rolled out the dough between two pieces of parchment paper. I found it a bit easier to do it this way as parchment paper creates a non stick surface and you avoid changing the color of the dough since you’re not using flour.
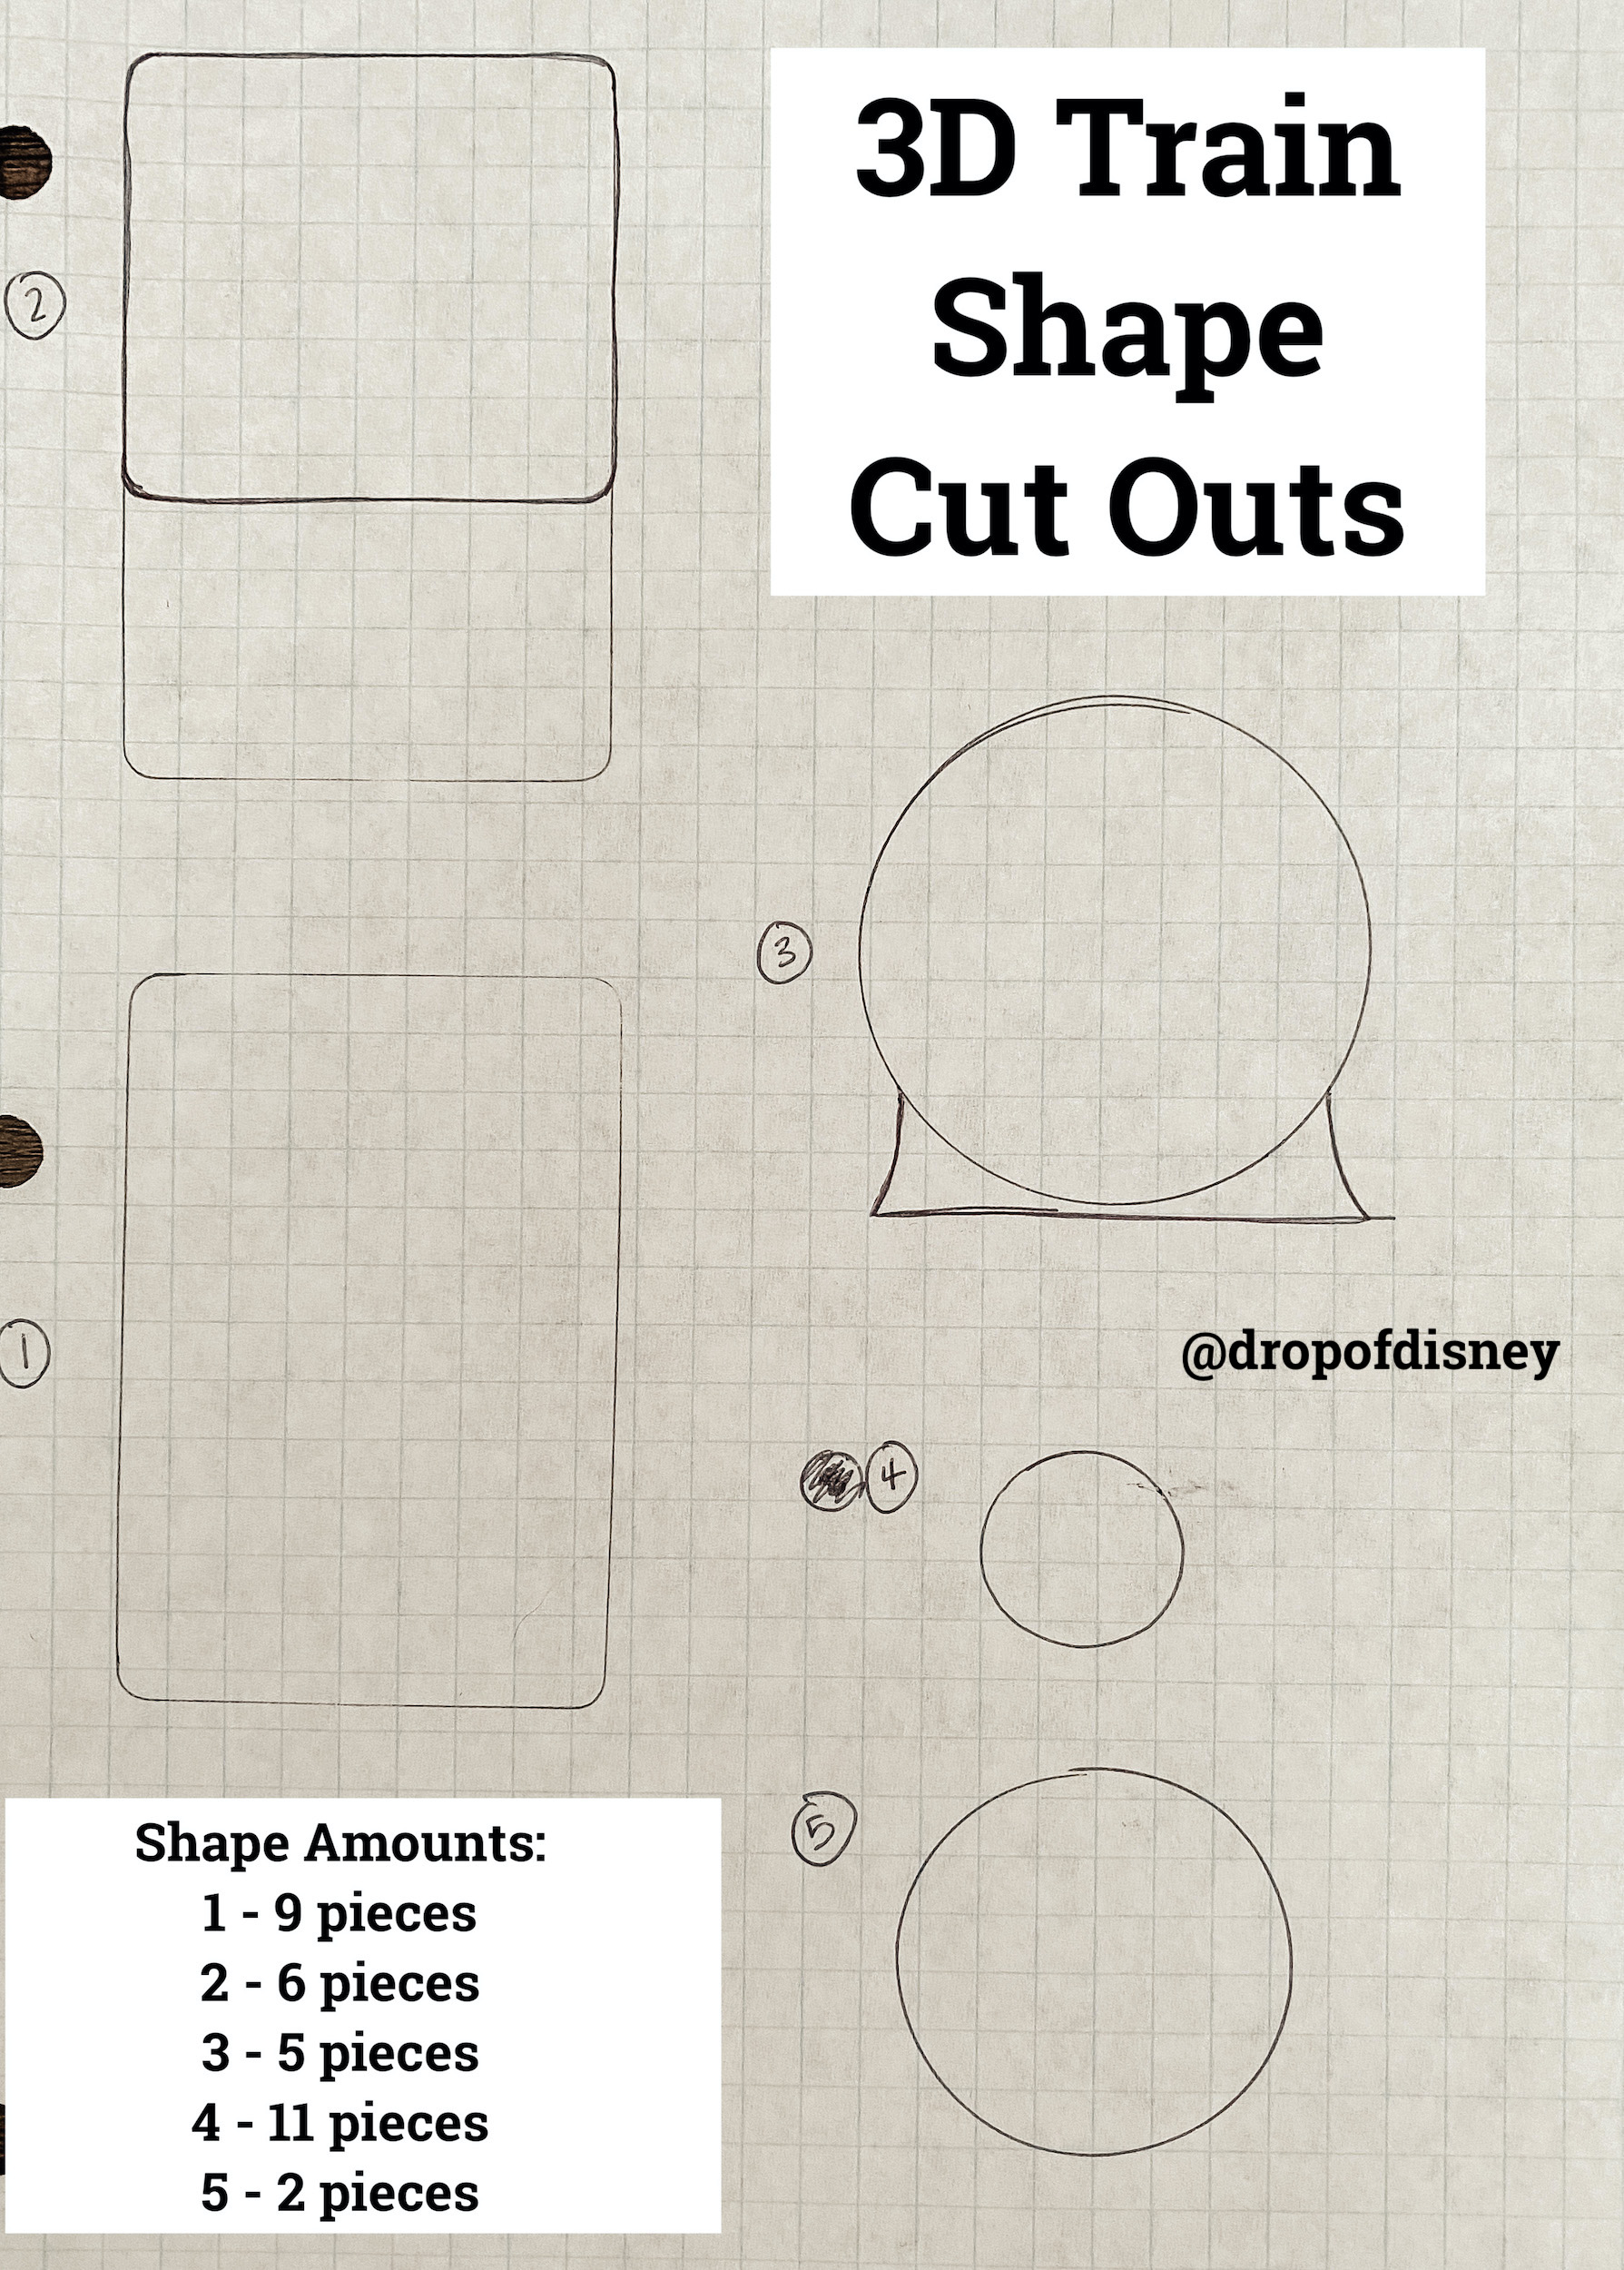
With your dough rolled out, you’ll start cutting out the shapes of the train pieces. To make my pieces, I used a mix of pre-made cookie cutters and hand drawn paper templates. The basic shapes you’ll need are a rectangle, square, and circles. I used a 3×2 inch rectangle cutter from a set by American Crafts and then a 1 inch, and 1 1/2 inch round cutters from this circle cutter set. The rest of the shapes I cut from a paper template. I’ve linked my full template with all of the shapes I used so you can just use these and a sharp knife to cut out the dough! Make sure to print them out at full size.

Transfer the cut out cookies to the parchment lined baking sheets and bake the cookies for 10 minutes. Let them cool for 5 minutes before transferring to a wire rack to cool completely.
While the cookies are cooling, make the icing. Since we’re building a 3D cookie train, I used royal icing as it makes a great edible glue. I added a touch of orange extract to the icing as well. To make the icing, whisk together the powdered sugar and meringue powder. Add the water and beat until combined. Once combined, beat on high speed until the icing is glossy and holds stiff peaks.
Scoop a bit of icing into a separate bowl and stir in the red gel food coloring. I used the red from this AmeriColor set. Transfer both the white and red icing to piping bags fitted with small to medium round piping tips.


Then, start assembling your train! First, assemble the train carriages. Take three rectangle cookies and place one flat on your working surface. Pipe a line of icing on one of the long edges of each of the other rectangle cookies. Press the edges with the icing onto the long edges of the flat cookie bottom. Pipe icing around the bottom and sides of the short sides of the carriage. Place one square cookie on each side of the carriage. Repeat all steps to make a second carriage. Set aside to let the icing set completely.
Then, assemble the engine car. Place a square cookie flat on your working surface. Pipe two lines of icing along the front and back edges of the cookie. Place two rectangle cookies short edges down into the icing. Pipe icing around three edges of two square cookies. Press one cookie onto each side of the engine car, to make a window. Set aside to let the icing set completely.

Next, assemble the engine by taking 4 engine shape cookies and piping icing on the front of three of the cookies. Stack them on top of each other and set aside to let the icing completely. Once set, pipe icing on the back of the last cookie and press into one of the long rectangle cookies that make up the engine car. Take the leftover engine front cookie and cut the bottom off of it. Pipe around the top and back of the bottom piece and attach to the bottom front of the engine.
Assemble the smoke stack by taking 3 small circle cookies and piping icing on the front of two of them. Stack them on top of each other and pipe a swirl of icing on the top cookie. Add the wheels to the carriages by piping some frosting on 8 small circle cookies. Place two on each side of the carriages. Pipe some frosting on two of the medium round cookies. Place one on each side of the engine car. Pipe some icing on the bottom of the smoke stack cookies and place on top of the engine cookies.
Decorate one of the leftover rectangle cookies as desired and place on top of the engine car. If you don’t want to put anything into that car, you can secure the cookie using a bit of icing. Decorate the rest of the carriages as desired, using the red and white icing. I added some red dots, Mickey heads, and decorative piping to the edges of the carriages. I also used mini figures from this toy set to add Mickey, Minnie, and Goofy to the train!

All aboard! Enjoy this runaway cookie train and if you’re heading to the parks, let me know how the new ride is!
Disclaimer: Links in this post are affiliate links. As an Amazon Associate I earn from qualifying purchases.

Mickey & Minnie’s Runaway Cookie Train
Take a ride on a runaway railway with this chocolate orange cookie train! Decorated with orange royal icing, it's the perfect centerpiece to celebrate Mickey & Minnie’s new ride in Hollywood Studios!
Ingredients
Chocolate Orange Cookies
- ¾ cup unsalted butter, softened
- 1 cup granulated sugar
- 1 large egg, room temperature
- 1 teaspoon vanilla
- 2 teaspoons orange extract
- 1 ½ cups all-purpose flour
- ¾ cup unsweetened cocoa powder
- 1 teaspoon baking powder
- ⅛ teaspoon salt
Royal Icing
- 2 cups powdered sugar
- 1 ½ tablespoons meringue powder
- ¼ cup warm water
- 1 teaspoon orange extract
- red gel food coloring
Equipment
- rectangle cookie cutter (3×2 inches)
- square cookie cutter (2×2 inches)
- small round cookie cutter (1 inch)
- medium round cookie cutter (1 ½ inch)
- train engine template (see below)
- OR
- paper templates (see below)
- sharp knife
- piping bags
- small or medium round piping tips
Instructions
Chocolate Cookies
-
In a medium bowl, whisk together the flour, cocoa powder, baking powder, and salt. Set aside.
-
In a large bowl, beat the butter until smooth and creamy. Add the sugar and beat until light and fluffy, about 2 minutes. Beat in the egg and vanilla, scraping the sides of the bowl as needed.
-
Gradually add the flour mixture to the wet ingredients, beating on low until combined.
-
Divide the dough in half, shape into two disks, and wrap in plastic wrap.
-
Place dough in the refrigerator to chill for about 1 hour.
-
After the dough has chilled, remove from the refrigerator and preheat the oven to 350 F. Line two baking sheets with parchment paper.
-
Place one disk of dough between two sheets of parchment paper and roll out to about ½ inch thickness.
-
Cut dough out using cutters, paper templates, or a mix of both. To make two train cars and one engine, you will need 9 rectangles, 6 squares, 5 front train pieces, 11 1-inch circles, and 2 ½ inch circles. Cut some extras too, in case one breaks.
-
Place cut cookies onto prepared baking sheets and bake for 10 minutes. Cool on the baking sheet for 5 minutes before transferring to a wire rack to cool completely.
Royal Icing
-
In a medium bowl, whisk together the powdered sugar and meringue powder.
-
Add the water and orange extract and beat on low speed until combined.
-
Beat on high speed until glossy and icing forms stiff peaks.
-
Transfer a couple scoops of icing to a separate bowl and stir in desired amount of red food coloring.
-
Transfer both bowls of icing to piping bags fitted with small or medium round piping tips.
Assembly
-
Once the cookies have cooled completely, start by assembling the carriages. Take three rectangle cookies and place one flat on your working surface. Pipe a line of icing on one of the long edges of each of the other rectangle cookies. Press the edges with the icing onto the long edges of the flat cookie bottom. Pipe icing around the bottom and sides of the short sides of the carriage. Place one square cookie on each side of the carriage. Repeat all steps to make a second carriage. Set aside to let the icing set completely.
-
Assemble the engine car. Place a square cookie flat on your working surface. Pipe two lines of icing along the front and back edges of the cookie. Place two rectangle cookies short edges down into the icing. Pipe icing around three edges of two square cookies. Press one cookie onto each side of the engine car, to make a window. Set aside to let the icing set completely.
-
Assemble the engine by taking 4 engine shape cookies and piping icing on the front of three of the cookies. Stack them on top of each other and set aside to let the icing completely. Once set, pipe icing on the back of the last cookie and press into one of the long rectangle cookies that make up the engine car. Take the leftover engine front cookie and cut the bottom off of it. Pipe around the top and back of the bottom piece and attach to the bottom front of the engine.
-
Assemble the smoke stack by taking 3 small circle cookies and piping icing on the front of two of them. Stack them on top of each other and pipe a swirl of icing on the top cookie. Set aside.
-
Add the wheels to the carriages by piping some frosting on 8 small circle cookies. Place two on each side of the carriages. Pipe some frosting on two of the medium round cookies. Place one on each side of the engine car. Pipe some icing on the bottom of the smoke stack cookies and place on top of the engine cookies.
-
Decorate one of the leftover rectangle cookies as desired and place on top of the engine car. If you don’t want to put anything into that car, you can secure the cookie using a bit of icing.
-
Decorate the rest of the carriages as desired, using the red and white icing. Let icing set completely before moving.